Get More Sewing Done

Last week I wrote about improving my social media skills because I had enrolled in a workshop, about growing your businesses with Instagram, on Skillshare. On of the things I learned was to plan and prioritize my use of images and one of the things I decided was to post more photos of people using my products and also have flat-lays of the things I use when designing and sewing with some behind-the-scenes info.

In order to have products to photograph I must produce more items, hence the blog post title Get More Sewing Done. Also, sewing is part of my design process, because I am looking for sewing patterns that I want to use as a base for planning my surface patterns for clothes collections.

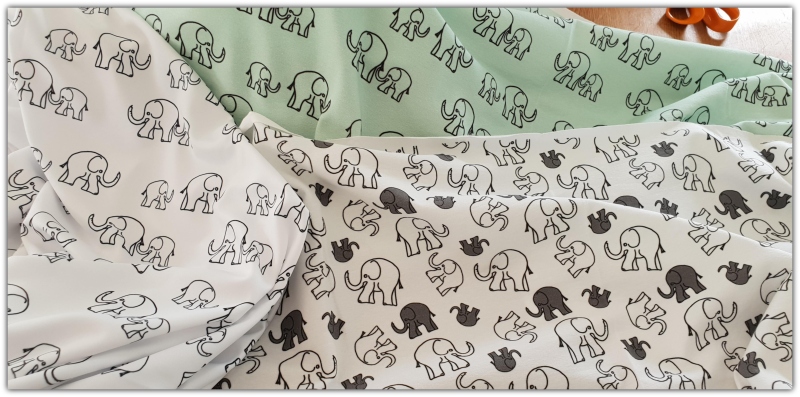
Above you can see some of the photos I posted on my Instagram account to showcase one of my latest surface design patterns called Neko because the design features the Japanese word neko, which means Cat, written in both the kanji and the hiragana script.

My fabric designs can be bought on several types of fabric in my shop at the print-on-demand site called Spoonflower. Their digital print process uses water-based pigment inks and dyes, with very little waste; they also have a selection of eco-friendly fabrics.

Next thing I need to get better at is taking great photos. I am watching some Skillshare classes on the subject as part of the workshop that I mentioned, but mostly it is just practice, practice practice. I might get myself a small tripod for holding my phone so I can take picture of myself with the timer function.

Practice makes progress…

next thing on my to do learn list: taking great photos

Improving my Social Media Skills

If you have read my recent blog posts, then you know that I am trying to evolve as a business owner and entrepreneur. I am already getting better at planning my time, which I talked about in my last post .

Another thing that I had prioritized to do was to define my target customer. Defining a target customer is very important for streamlining marketing so I don’t aim to wide when spreading the word about my business – of course, the more that knows about my products and services the merrier, but it would most likely weaken by branding and waste a lot of my time that I could otherwise spend on business development.

I have had a vague idea of my target customer for quite some time, but hadn’t put it down on paper before I watched the Skillshare class Instagram for Business: Build an Engaged Community by Tyler McCall. I really enjoyed this class and I felt I learned a lot – if you want to get better at marketing your brand on Instagram, then this class definitely for you. I took this class as a part of a Skillshare workshop to learn how to master Instagram for my business/brand. I am looking forward to furthering my skills, and can’t wait to see what the next to classes in the workshop has in store for me.

The assignment for Tyler’s Skillshare class is to take what I have learned and make a post for Instagram and also write what type of image and caption I chose and why. My head is full of ideas and I am eager to see what I come up with.

Back to business

I am calling this post Back to business because today is the first official workday after 5 weeks of summer vacation with my family.

Picture of me and my children at Tegernsee on our vacation in Germany.

In my last blog post, I had set a goal to blog more often – preferably at least once a week. This obviously didn’t happen during my vacation. But I am not disappointed in myself, because one of my reasons to venture out as a business woman is to spend more time with my family, which vacation time is all about.

I did manage to squeeze in a tiny bit of work here and there to enter a couple of designs in some of the Spoonflower design challenges. I also searched the internet and read up on ways to plan and manage a one woman business.

One of the resources that I came across in my searches is the great – and totally free – advise from Bärbel Dressler. She is a very talented Swedish surface designer that through hard work, dedication and talent has build up her business. She very generously shares her experience regarding setting up and running her one woman company on her website www.bearbellproductions.se – one of the resources for running a business that she she shares is a 6 step tutorial for making a 3-year plan and I am currently trying to apply this approach to my own business.

Another thing that I have read over and over again is that a business should have a clear vision of their core customer in order to cater to them and direct marketing to the right audience. I will over the next few weeks brainstorm and make mood boards in order to hone in on my type of clients.

Another project that I am working on is product development. I am very excited about this, and really hope that my testing shows that it is doable and that my calculations will show that it is economically feasible.

I will leave you with a sneak peak of my product testing.

Prioritizing my ‘to do’s

I am sure I can’t be the only creative person with a mind overflowing with ideas which lead to several lists of ‘to-do’s. I come up with ideas faster than I can make them happen. I try to organize using Trello, but I am a very visual person and I like writing and drawing on real paper too, so often I end up with lists on several sheets which I then have to boil down into digitized lists on Trello that I then later have to remember to refer back to. I am a huge lover of efficiency and the ease of digitized all-in-one-place that Trello gives me, but somehow I am more drawn to looking at paper than lists on screen, so more often than not I forget to check my long term planning Trello to-do lists and only refer to my daily and weekly to-do lists in my paper agenda. So one step on my journey to evolve is to train my planning and execution skills for long term ideas and plans.

Since June is coming to an end I have been thinking about setting up a goal for July and one of the points from my long term to do lists is to blog more regularly, so my next monthly resolution is to

Blog more often – preferably at least once a week.

my goal for July 2019

This means that by the end of July I should have posted on my blog at least 5 times. I am excited to and a bit skeptical at the same time – lets see how this goes.

Evolving in my new career

As of the beginning of March I am an entrepreneur – I quit my job as an application engineer and ventured out on this adventure to become a self employed business woman working as a surface designer. I also freelance as a CAD specialist teaching the 3D drafting program Solid Edge, so I have not totally detached all connection to my former career. 😉

So – a bit more than 2 month have gone by, and it has been fun testing my new surface designer wings, but now I feel it’s time to set a course for where these wings should take me.

During the weekend, I pondered about what I would like to happen with my new business as a surface designer. It can be rather overwhelming with all inspiration I get from reading about other successful designers on the internet, and I really don’t want to get caught up in trap of comparing myself with others; especially those who have already spent years of hard work and determination to be successful. Instead i want to think about where I want my business and career to be 5 years from now and how I can get there and enjoy the journey along the way.

I have watch my fair share of Pokemon cartoons when I was a kid, and I realized that the concept of evolving from a low level pokemon to a high level fully evolved one can maybe applied to my new career.

Today I am like a Charmander, but I know that with enough training, practice and life experience I can evolve into a the equivalent of a charmeleon and eventually the equivalent of a
Charizard and who knows maybe even mega Charizard!

So my journey of training and dedicated practice starts today. I am plotting out my path so I won’t be side-tracked and lost along the way.

First evolution goal is to become my equivalent of Charmeleon – earning some money from working with surface design and illustration while at the same time enjoying the process and having fun.

In my next post i will write about what goals I have set myself to eventually achieve this evolution and what steps I take to reach those goals.

My own designs on fabric!

I started this blog to write about my creations, be it sewing, cooking, baking etc. and now I have discovered a new and exciting thing to be creative with:

Fabric designs!

I have been sewing quite a bit lately, even though I don’t blog about it. Recently I was on the hunt for a fabric with crabs on it for my crab-loving toddler, but I didn’t find any so I wondered if I could make a design myself, and after some googling I had stumbled into the wonderful world of pattern making!

I will share with you some links to some of the resources and tutorials that I have found to be useful at the end of this blog post, but first I’ll show you some photos of the first fabrics with my very own designs and the t-shirt that I have sewn with two of the designs. 🙂

Tshirt_w_crab_pattern

And here’s a close-up. 🙂

Close-up_tshirt_w_crab

I have drawn the artwork on my Samsung tablet using some art apps . These are the three apps that I’ve been using so far. The one that says Design is actually called Infinite Design and is quite good. The full version cost a reasonable on time amount.

art_apps_on_tablet

And here’s a look at the drawings that I made for the fabric design:

sealife_art_on_tablet

crab_art_on_tablet

After drawing the pictures for my design, I used either the open office programs GIMP or  Inkscape to clean up the edges and make the background invisible.

For creating the actual repeating pattern design, I have two methods that are free. One is the program Patternshop and the other is using Inkscape. I will link to tutorials for both methods below. For those who are willing to pay for an Adobe Illustrator subscription, I will also link to a tutorial for how to make repeat patterns with that.

When my repeat pattern is done, I upload it to spoonflower.com where I am slowly building up a nice collection of designs that can be printed on a wide selection of fabrics. I plan to make my favorite designs available for sale in case others would like to buy them too. If you want to see public collections on spoonflower you click here:

Made by Nefermiw

Yesterday I received the fabrics that I bought with my first attempt at designing fabrics. I had also ordered some colour on fabric samples. Spoonflower also gives you the option to order several designs on a yard of fabric.

parcel_from_spoonflower

Fabric_crab_pattern_and_bubbles

fabrics_w_elephants

fabric_w_circles

Kelp_rapport

The last picture is of a yard of organic cotton knit with a kelp design – I am going to make a dress from for myself. 🙂


As promised I will link to some of the video tutorials that I have found to be useful:

How to make repeat patterns in Adobe Illustrator

How to make repeat patterns with Patternshop program

How to make repeat patterns with Inkscape


Green sun pie

This pie is delicious. I slightly modified the recipe from a magazine.

I used store bought ready to use pie dough, but of course you can make your own.

You need two batches of dough.

Set the oven to 175 deg C

Make filling by mixing:

100 g baby spinach

100 g basil leaves

250 g ricotta cheese

50 g pine nuts

After mixing stir in:

60 g freshly grated parmesan cheese

1 egg

Roll out both batches of dough to roughly 30 cm in diameter and spred out filling on one leaving a little hill of it in the middle and leaving the edge bare.

Brush beaten egg around the bare edge and place the second circle of dough on top.

Press around the edge with a fork.

Put a small bowl upside down in the middle and cut “sun beams” around the bowl.

Twist the beams and brush the whole pie with beaten egg.

Bake for 20 to 30 minutes.

The skirt is finished 

I finished the skirt yesterday!

I was a relatively easy skirt to sew, but I did encounter a small challenge when I made the elastic waist. At first it was a challenge to get the elastic band through the very long casing, but I taped it to a long plastic stick and guided it through.

Then, unfortunately, one end of one of the elastic bands got loose after I had sewn them in place, so I had to cut open some of what I had just sewn and then try to get a hold of the loose end inside the casing.

After that I just had to attach the last pocket and then the skirt was finished!

Here I am wearing it – not the best photo, but you get the idea. I love the pockets. 🙂

Here is a close up of the waist and pocket details…